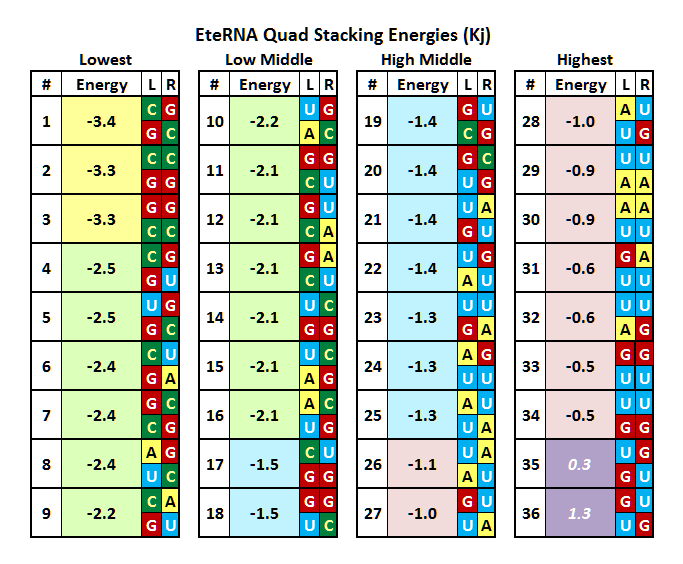
I was a bit frustrated and unsatisfied with not being able to see the Free Energy of a formation in my Lab Designs until I actually clicked the mouse and created it. Too often, the results were not what I had planned or expected - so, to remedy this, I created the following table in Excel to set out the various energies of the various Quads in tabular format for easy sorting and viewing, and for use as a reference during Lab Design Activities.
For this table, I am defining a “Quad” as a set of four bases, or two adjacent base-pairs. This structure is the basis of the Stack; a "Quad is like a “rung” in a “Stack-Ladder.” A “Quad” is also the unit that has it’s Free Energy displayed (with the label “Stack”) in the Free Energy Window Display when you hover the mouse over the Stack. You’ll notice that this "Stack figure is not for the whole stack, but only for the “Quad” over which you are currently hovering. (This is not clear in the game for newer players, since the Stack is defined in the Tutorials as the whole “laddered” section between loops - so to keep meanings clear, I’m using “Quad” instead of “Stack” as it is labeled in the Free Energy Window, for the unit of two base-pairs consisting of four bases)
The Quads in the table are represented and displayed in 2x2 cells with the pairs in the vertical plane; that is, the pair is the set of two bases above and below one another. Each Quad consists of two of these vertically oriented pairs rendered side-by-side. The colors reflect the game base colors, and the Energy Number background colors reflect a rough, arbitrary division of Very Low, Low, Middle-Range, High, and Very High energy values.
It turns out that there are 36 unique Quad configurations. I created them in the spreadsheet at first in a sort of binary order, but after having them all laid out, I realized this table would be far more useful if sorted by Free Energy values.
Note that many of the permutaions are horizontal or vertical reflections of another Quad; some are 180-degree rotations. while still others are “half-twists” of another Quad. However, many very similar configurations have very different associated free-energy values. In particular note the energy differences between Quads 1 & 7 (30% energy difference), and between Quads 23 & 32 (54% energy difference), or again between Quads 33 & 36, where flipping one pair results in a change from -0.5 to +1.3! - easily the difference between stability and instability in a design
This table has also helped me to dispel at least one very popular misconception: that side by side AU pairs are stronger than an AU/UA pair. Not so, as this table reveals (Quads 29 & 30 vs. Quads 25 & 26); this is just not as apparent in the game readout. This table, it turns out, is full of little bits of helpful reference like that. And having it all laid out in Ascending Energy order is very convenient and helpful when designing for the Lab.
So, anyway here is the table; I hope this helps some of you all in constructing your Lab Designs; I have found that is has helped me quite a bit, both in increasing understanding, and as a reference in the Lab Design process. At the very least, it may be useful to familiarize yourself somewhat with this finite vocabulary of Quad variations and their associated Energy Values, or just for a quick glance every now and then for some particular question.
Best Regards,
-d9